
Section 1: Web Development
Chapter 5: Website Design
Website design is a topic of study often neglected until after a programming background has been developed. Worse, it may be entirely ignored or missed by computer science students when courses covering the topic are in other programs like graphic arts or media. This results in programmers trying to understand how to write code meant for layout and design elements without understanding design. By studying these elements first, we can develop a better knowledge of the concepts of web design before we write code. Progressing through the topics in this section during your site design will greatly ease your development efforts in the future, allowing stakeholders to understand the project and provide feedback early on, reducing (re)development time.
A number of factors affect design in web development, complicating what would otherwise appear to the end user to be a relatively simple process of displaying a picture or document. In truth, the development process involves not only the HTML and multimedia that make up the visual aspects of the page but also considerations of software engineering, human-computer interaction, quality assurance and testing, project management, information and requirement engineering, modeling, and system analysis and design.
Today’s sites are now becoming more application centered than traditional sites. This further complicates our projects as we integrate with legacy software and databases, strive to meet real-time data demands, address security vulnerabilities inherent to the environment we are working in, and ongoing support and maintenance typical of robust software applications.
In response to these advances in complexity and capability, web development has grown to embrace many of the same development processes of software development. We will consider some of these processes below, which you may wish to use depending on the size and complexity of a given project.
Planning Cycle
Web development is best achieved as a linear process, but is usually completed asynchronously. The planning process described is intended to build upon itself to refine project requirements, look and feel, and development plans. However, limitations in timelines, mid-project revisions, and the extensive time that can be invested into the early stages of design lead many programmers to begin development while a project is still in design.
Starting early with programming during design planning can accelerate a project when the elements created early on are unlikely to be affected by later changes in the scope. When done carefully, early programming also allows an opportunity to test concepts before investing time into an idea that may not work. It is important to avoid aspects that are assumed to change, like visual layout or particular pieces of content, instead focusing on data structure, frameworks, and other components that are easily adapted to design changes.
While you are planning, keep an eye out for indicators that things are going off-track. Some of the more important flags that should be resolved include:
- Vaguely defined use cases and inadequate project requirements
- Overly broad or undefined scope of features
- Unresolved disputes between stakeholders about project features
- Unrealistic time table, budget, or inadequate resources
When considering your milestones, tasks, objectives, or whatever label you or your team place on objectives, a handy acronym to reference is SMART. SMART stands for Specific, Measurable, Attainable, Realistic, and Timely. The idea is to check all of your objectives against these criteria to determine if they are appropriate and well developed. By ensuring all of your objectives meet the SMART criteria, you will have a better chance of keeping your project on time and well planned.
Specific:
Is your objective specific enough to convey its full scope? While you do not want to specify implementation of the objective, you should convey enough specific information that the person assigned to the objective can begin their portion of implementation.
Good Example: Deliver our standard proposal with adjusted price quotes to reflect customer’s discount rate of 15%.
Bad Example: Deliver a proposal to the customer.
Measurable:
Your objective should have a clear indicator of when it is complete.
Good Example: Complete the first 15 pages identified in the site plan.
Bad Example: Complete the first 20% of the site.
Attainable:
Is it possible, at all, to complete the objective?
Good Example: Get the server to a FedEx store by close of business on delivery date.
Bad Example: Drive the server from New York to California within 24 hours.
Realistic:
Is it possible to complete the objective given the timeline and resources on hand?
Good Example: Have Team A (staff of 20) complete 10 pages by tomorrow.
Bad Example: Have Bob the Intern complete 10 pages by tomorrow.
Timely:
Will the objective be useful if it is completed at (not near or before) its deadline?
Assuming a proposal deadline of Friday morning:
Good Example: Have draft sitemap completed by the end of Wednesday to include in the proposal.
Bad Example: Have draft sitemap completed by the end of Friday to include in the proposal.
“But, wait, Attainable and Realistic sound like the same thing!” Well, yes they are quite similar. However the difference lies in what else you know about the project, timeline, resources and objectives. In our Realistic example this is highlighted by specifying the resources available for the objective. While our example company could assign sufficient resources to complete 10 pages in a day, it could never drive a server from New York to California in a day no matter how many people it has or how fast their car is given current speed limits. In the same vein, the objective of creating 10 pages in a day is perfectly attainable for our example company, but is not realistic if your company lacks enough manpower to complete the task.
While we broke these examples down to highlight the particulars of each element of our litmus test, real world objectives would contain all of these together in up to two or three brief sentences:
Team A will complete the customer’s proposal using our standard forms including their discount and a sample site plan by the 15th for delivery the 20th.
Now we need to test it. Is the objective specific? Yes. We are not left needing basic questions asked before we could work on the objective. Is it Measurable? Yes. We have a deadline of the 15th of the month for a specific list of items. Is it Attainable? Yes. With appropriate resources there is nothing impossible about the objective. Is it Realistic? Assuming Team A has enough time and manpower to complete the task by the deadline, yes. Is it Timely? The work is due 5 days before delivery, allowing time for review, changes, or delays, and its deadline does not extend beyond its useful life, so yes, we have a SMART objective.
How do we come up with our objectives? We extract them as the “big things” that need to be done from the customer’s request, the mission statement, or other sources of information that define the scope of your project.
What do we do with our objectives? The individual(s) tasked to the objective will break it into actionable tasks, or individual items that need to be completed. For example, our hypothetical objective of ten pages in a day could be broken down into ten tasks, one for each page. Helpful Hint: SMART can be applied to tasks, too (really any future planning/goal).
Why bother with any of this? Why even create a scope document in the first place if we know things will change? Well, we do it because things will change. New ideas will crop up, problems might be found, or something might be forgotten in the mix. The planning stage will define for us and our client exactly what we are going to do, and what our price, time, terms, etc. are meant to cover. As a project is in progress, especially if iterative meetings are held with the client, new requests will come into play. These may be great ideas. They may be terrible. They may derail the project’s success if they are not completed. However, each of them will affect your timeline and resources. The tendency to squeeze in “one more idea” over and over again is called Feature Creep, as it creeps into your project and eventually eats away at your resources and profit.
Learn more
Keywords, search terms: Website planning, web development plan, planning templates, project management
Good Planning Worksheet: http://www.goodworkmarketing.com/docs/WebsitePlanningGuide.pdf
BusinessBalls.com Guide to Project Management: http://www.businessballs.com/project.htm
The Fold
As we begin to develop our pages, we need to begin to consider where we want to place pieces of our content. If you look at newspapers, you will find that the most attractive story of the day (as decided, at least, by the publisher) is emblazoned in large letters near the middle or top of the front page, surrounded by the name of the paper, the date, and other pieces of information that quickly lend to your decision of whether or not to purchase a given paper. This is done intentionally, to make the paper attract your attention and get you to buy their edition over their competitors. In the printed news industry, the prime retail space in the paper is the top half of the front page, or what you see when the newspaper is folded normally at a newsstand. This is referred to as “above the fold,” and is crucial to getting their audience’s attention. This also applies to websites, except in our case, our “above the fold” is what the user sees on the landing page for our site, without having to scroll down or use any links.
What you typically find here is the name and or logo of the company, and what they feel is most important for you to see first. As you begin to analyze web pages in this light, you will find it very easy to determine what kind of site they are, or what they want or expect from you as their guest. News sites will typically follow a similar setting to a printed paper, leading with headlines and links to other sections. Companies will lead with a featured product or sale to attract your attention, and search engines will make the search bar prominent, usually with ad space close by to increase their revenue streams.
 The concept of “The Fold” is another of the many highly argued concepts in web development. Proponents are quick to point out the same example I used of traditional print media methods, while detractors will argue that if it were true, scrolling would never have been created, or users would lose interest in following links. While I endorse “The Fold” as a useful approach to landing pages, I do not mean to imply that all of your pages should fit on only one, non-scrolling screen.
Recent trends on sites like Facebook and LinkedIn show us there are in fact places for scrolling. Indefinitely, as it were. Both sites now feature status pages where older content is continuously appended each time you near the bottom of the page. This is quite similar to the concept of paging, but instead of clicking a link to the next page, the content is simply written in at the bottom creating a never-ending feel to the page. Ultimately, your design phase will help identify where following “The Fold“ is not really an option, or if there is enough content to warrant indefinite scrolling, and all other ranges in between.
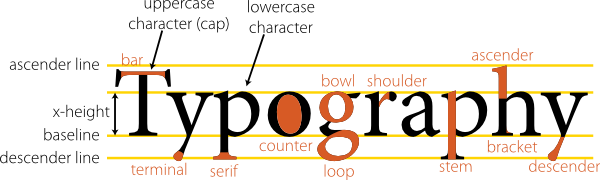
Typography
Typography is the study of font. While an important topic in media arts, it has until recently received little attention in web development. Utilizing unusual fonts used to be a complicated process that required the end user to have your font(s) installed in order to see the site as you intended. Now, advances in CSS allow us to use unusual fonts by connecting to them through our styling. This allows us to use a tremendous variety of fonts in our sites to add to our look and feel, adding an aspect that has unlocked new approaches to design. Some of the elements of typography include the study of features like readability, conveying meaning or emotion through impression, and the artistic effect of mixing styles.
 Public Domain—openclipart.org
For ease of reading and to avoid a cluttered appearance, most sites keep to two or three fonts when creating their design. One for text, and one or two for headings, titles, and distinguishing marks. All of these should be kept in the same family for a more congruous experience, and each unusual font defined in your site should include fallback definitions in case there are problems loading your primary style (we will see this in examples later on). You may want to set your regular text as one of the standards supported by all browsers as users are most familiar and usually comfortable with that set.
Web Fonts
To tap into this aspect of design, a great place to start is with the Google Fonts website. This site is a repository of character sets for a great variety of fonts that you can link to or download and include in your own site’s files. We will look at connecting to these later, but browsing the site now will give you an initial look at the amount of variety that is available for design.
Site Maps
A site map is a file that contains a master list of links to the pages on your site, and can provide information about those pages like how often they are updated, how pages connect to each other, and how important it is relative to the other pages. It can be a reference tool to both Bots that index your site for search engines, as well as your visitors trying to find particular content. Site map files are XML documents arranged in hierarchical format that bots read to gain understanding of your site layout, page relevance, and organization. The file may also be a human readable page that diagrams how pages relate to one another, and serve as a master list of the pages in your site. Site maps are best kept in the root of your website, at the same level as your initial index page.
While a complete site map cannot be finalized until after your site is ready to be published, I include site maps under development methods because laying out your site’s organization on paper will help with developing your menu system, logically organizing content, and in defining the scope and purpose of your site. The more content or pages you can define at the beginning of the process will reveal information that will help during your design phase.
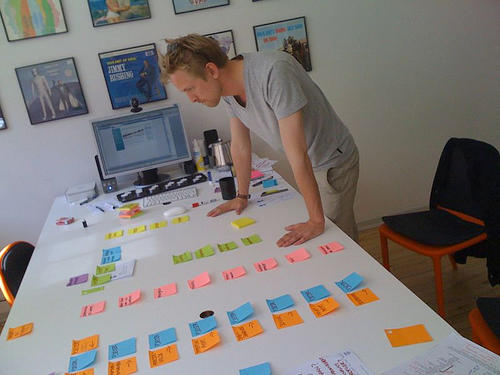
To create a site map, you can start by creating a running list of all the content you wish to have on your site. Anyone involved in the production or validation of content should be in room! In each of these steps, it is important to identify your stakeholders. As you are creating your running list, it is often helpful to use index cards so you can determine by card color or pile where a particular piece of content should be. This will help you discover your menu system, as you create names for piles of cards as your menu title. After, as you diagram what cards are with what pile and where that pile is relative to others, your site map will begin to take shape.
 Creative Commons 2.0 Licensed by Kent Bye
If you are rebuilding an existing site, you may wish to adapt the existing menu system or scrap it entirely and start new. Larger sites or those with a large number of stakeholders involved will need more time to complete this step. To break larger projects down, you may wish to begin by defining what type(s) of content you do not want on your site. For example, if your target audience is casual shoppers looking for in-home plants, you can eliminate information on plants not suited for indoor living, or restrict the amount of information provided to basic care and maintenance, as opposed to the greater detail professional landscapers will look for. Distributing the process of identifying what material needs to be published into several groups of stakeholders who share interests in certain categories will also help streamline this process.
The sitemap you create should follow the URL standards RFC-3986 (notably the use of entity escape codes) and the standards for XML. Your character encoding must also be in UTF-8, which means some special characters and markings beyond those traditionally used in text will not be available. Once your sitemap is complete and uploaded, you can add it to your robots.txt file as:
- Sitemap: http://www.yourwebsite.com/yourfilename.xml
You can also submit your site (and sitemap) for crawling directly to the search engines. While this may not happen immediately, it lets them know that your site is new or has changed. Some engines, like Google provide tools and reporting for a comprehensive experience while others like Bing have quick entry forms that only require your site’s main URL and a confirmation that you are, in fact, human (which seems amusing when you consider the point of what you are doing is to trigger a bot).
Let us plan a small site of just a few links: our index page, a contact page, an information page, and publications and research pages off of our information page. As an XML file, our visual sitemap above would be expressed as the following:
- <?xml version=”1.0″ encoding=”UTF-8″?>
- <urlset xmlns=http://www.sitemaps.org/schemas/sitemap/0.9>
- <url>
- <loc>http://www.oursite.com/</loc>
- <lastmod>2013-01-13</lastmod>
- <priority>0.8</priority>
- <url>
- <url>
- <loc>http://www.oursite.com/contact.htm</loc>
- <lastmod>2013-01-13</lastmod>
- <priority>0.9</priority>
- <url>
- <url>
- <loc>http://www.oursite.com/publications.htm</loc>
- <lastmod>2013-01-13</lastmod>
- <priority>0.5</priority>
- <changefreq>monthly</changefreq>
- <url>
- <url>
- <loc>http://www.oursite.com/information.htm</loc>
- <lastmod>2013-01-13</lastmod>
- <priority>0.5</priority>
- <url>
- <url>
- <loc>http://www.oursite.com/research.html</loc>
- <lastmod>2013-01-13</lastmod>
- <priority>0.7</priority>
- <url>
- </urlset>
As we are focusing on the sitemap aspects of this example at the moment (we will learn more about XML later), just take note that the <loc>, <url>, and <urlset> tags for location are required. Everything else is optional, but adds more information for site crawlers. You will also note that in this example you cannot deduce the menu or hierarchy that we saw in our visual diagram—indexing services do not care about this. For a site visitor, we would style this page differently or create a sitemap optimized for our visitors to read.
Robots.txt
Robots are automated scripts typically used to index, or take inventory, of the content in a website for use in things like web searching sites or collecting statistics. A robots file is a basic text file kept in the root folder of your website that instructs these robots on what sections or types of content in your site you do or do not want them to index. Legitimate robots will read this file when they first arrive on your site to honor your request. Keep in mind this is an enforceable act, and malicious or less-than-reputable robots are still perfectly capable of reading through all non-privileged (i.e. no login required) content on your site.
The simplest robots.txt file involves only two lines:
- User-agent: *
- Disallow: /
The first specifies that the rules below apply to all robots that read the file. The second adds that nothing is allowed below (meaning deeper, or all the files and folders inside of) the root folder ( / represents the main folder of the site). If we wanted to be more specific about what sections we want to keep bots out of, we can identify them individually instead of the whole site:
- User-agent: *
- Disallow: /pictures/reserved/
- Disallow: /index.php
- Disallow: /media
- Disallow: /scripts
To distinguish cases where a particular bot has a different set of permissions, we can use the bot’s name in place of our “all” wildcard:
- User-agent: BadBot
- Allow: /About/robot-policy.html
- Disallow: /
- User-agent: *
- Disallow: /pictures/reserved/
- Disallow: /index.php
- Disallow: /media
- Disallow: /scripts
The above settings tell BadBot that it is allowed to see the policy file, but nothing else. It still specifies the blocked paths for the rest of the bots that might visit.
Wireframes
Wireframes in the web development world are not exactly their literal three dimensional counterparts in the real world, but they bear a similar purpose. A wireframe may include things like location and size of elements such as a login button, where banners and content sections will sit, and provide an overall idea of how a site will operate. When wire framing a website, the idea is to create a mockup of one or more designs that portray how the interface might appear to the user. By the end of your wire framing process, you should have an idea of how the site will operate, and have resolved questions over where users will find particular features and elements.
Wireframes typically do not include color, actual content, or advanced design decisions like typography. Some of these considerations will have been at least partly addressed when creating your site map, and the rest will come once we begin storyboarding.
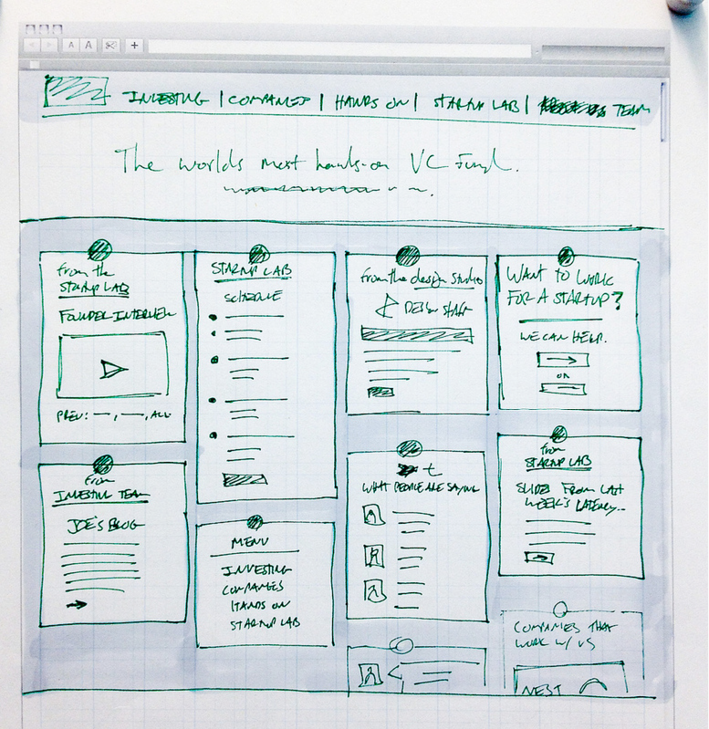
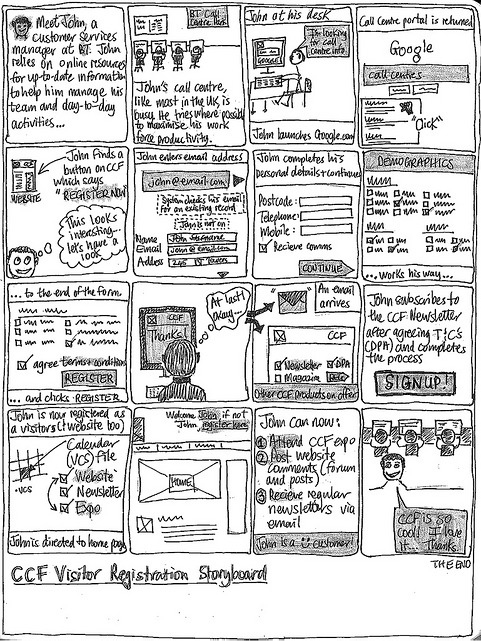
Storyboarding
Storyboarding a website is quite similar to storyboarding a TV show, comic, or other forms of media. Using our wireframes, we can begin to add color, font, and rough images to our documents. Keep in mind at this point we are probably still in a graphics editor or document style program like PowerPoint, Photoshop, etc. Real code is coming soon, but we can do more mock-ups faster without taking the time to make it function.
As you storyboard, you will create separate pages, or panels, for the screen a user would see as they complete the most important processes on your site. If you are selling something, for example, your storyboard may include examples of product pages, adding items to their cart, logging in, and completing their purchase.
By paging through these panels, you can see how the user experience will progress and identify potential problems like a confusing check out process, or you may discover that your shopping cart block from wire framing may be better off in a different, more predominant location. This process may be repeated several times until a final version is accepted by everyone in the decision process.
 Creative Commons 2.0 Rob Enslin
Color Schemes
The process of determining the color(s) involved in your site could fill a book. In fact, it does. Regardless of the varying opinions of what emotions colors instill, or represent, the quickest way to alienate a user is to give them a visual experience that is unappealing. The layout, appearance, and cohesiveness of your site are something that are immediately judged when a user first visits. These elements influence everything from their impression of what the site represents, its reputability, and even its trustworthiness as an ecommerce option. If your site appears to be disorganized, dated and out of style, or seems too “busy” or complicated, you can lose users in less than ten seconds.
You can address this issue (even without an artistic eye) by following the techniques we discussed earlier to plan out a simple, intuitive interface, and by using tools to help you select and compare color schemes like http://colorschemedesigner.com/ or http://www.colorsontheweb.com/colorwizard.asp.
Whether you choose to study other books on the subject or not, a great way to keep current is to get ideas from what others are doing by following sites that list or rate sites by appearance such as the annual Times review and http://www.thebestdesigns.com/.
Learn more
Keywords, search terms: Web design, aesthetics, graphics, typography
Web Style Guide 3rd Edition: http://webstyleguide.com/wsg3/8-typography/index.html
TypeCulture: http://www.typeculture.com/academic_resource/
