
Section 2: Document Markup
Chapter 19: Rule Structure
CSS
Selectors

Figure 22 CSS Rule Structure
The selector is a good place to start with CSS. It is used to identify which item(s) the rule(s) following it will apply to, and is the first element of a rule definition. A selector can refer to an existing tag that is part of the HTML structure like unordered lists, paragraphs, inputs, or it can refer to a custom class, element’s name, or ID that we create. Selectors are followed by a set of braces { }, and the rules we enter in between the braces (the property we want to adjust, and the value we want it to have) apply to the selector we specify. We will look at some of these here (there are 40+ as of initial CSS3 components), focusing on those that are more frequently used. Take note that in CSS, we use the colon (:) instead of an equal sign (=) to assign values.
Classes
To take a look at how we can attach a “where” concept to our rules, we will attach some classes to our tags. This allows us to apply different styles to the same selector type, while adding the ability to be more specific about which occurrence we are talking about. We use classes by giving them rules in CSS and referring to them as attributes in elements that support them from our HTML document by using class=“nameOfOurClass.” When defining classes in our CSS file, we precede their name with a period to specify they are a class.
IDs
The ID attribute is used similar to how a class is used, with two differences:
- The ID is defined with a # instead of a period, e.g., #warning.
- You should use an ID only once on a page, as it should identify something unique to the document.
We already have our ID references in our HTML file anywhere we used id=“ourNameHere” attributes in our tags.
Examples
We will begin with a simple example and adjust our unordered list by disabling bullets. For now, we will put the rule in our <head> nested within <style> tags, which will allow the rule to apply anywhere on the page where the selector (in this case, ul) exists:
- <style>
- ul {
- list-style-type: none;
- }
- </style>
We could also write this rule in a more condensed form:
- <style>
- ul {list-style-type: none;}
- </style>
Since CSS rule sheets ignore white space, the line breaks only serve to make the document more readable when we interact with it. Minifying it (removing all of the extra line breaks by hand or with the use of a script) can reduce the size of larger style sheets, which can help performance (especially in mobile devices where we know this is of more concern).
By adding the rule above, we dictate the appearance of all unordered lists on our page. Rules specify the “What, Where, and When” aspects we want to define for the given selector. The “What” is the actual change we want to see—text in a certain color, an image in a specific location, and so on, just like our example above. In this case, we wanted to hide the default bullet markers. The “Where” is one or more specific locations, defined as a particular named element or when certain conditions are met, i.e. before every paragraph (p.before{}), or every link on the page (a{}). Finally, the “When” aspects allow us to control the site’s appearance based on different factors like if the display is mobile sized, or if the user clicked the print button (@media print {}).
By placing these examples in the <head> of our page, we have created an internal style sheet. This denotes that all of the style information we need to reference can be found in the page itself. We could also create external files with our rules. This allows us to have one or more CSS files in our site, and to apply those rules to one or more pages. The external file method is what we will predominantly use as it best fits responsive design, and separates the tasks our files are targeting.
Important Reminder
Using the inline method outside of JavaScript violates our responsive design and separation of duties! Another downside to this method is it would have to be applied to every paragraph we wanted it on within our page.
To connect a CSS file to our webpage, we would move all of our rules (everything inside the <style> tags) into a new document. After saving this new file with the .css extension, the browser will understand that everything contained is to be treated as if it were in our <style> tags. We can connect it to our page much like linking to another page in our server:
- <link rel=”style sheet” type=”text/css” href=”mystyle.css”>
In our <link> tag we provide a rel attribute of style sheet to identify the file’s purpose. The type attribute tells the browser how to expect the contents to be formatted (“text/css”), and href provides the location of the file. If the file was not in the same folder as the web page we are using, we would adjust the link just as we would in an <a> tag.
Past practice has been to create entirely different sites, complete with customized CSS and HTML pages, to support mobile devices. This kicked off the m.yoursite.com, or mobile.yoursite.com period where heavily modified versions of sites were maintained separate from the primary, desktop version. Now, with the use of responsive design methods and the newer features of CSS3, we can use one master CSS file for all aspects of our site.
You may wish to separate your CSS files while you are working on them, as one master file can become tedious to search through. It may also help to add multi-line or long comments in your file to delineate between organized sections of your CSS. Ultimately, by your release date, you will want to get all of your CSS back into one file. Compressing it with tools like http://www.csscompressor.com/ which remove the whitespace that makes the file readable while developing, and reduces the file size making transmission faster for the user.
Our final method of applying rules is inline. This refers to the practice of inserting the rule inside the attribute tag of the item in question. If we wanted to change the text color of a particular paragraph, we could go right to our HTML file and alter our regular <p> tag to read:
- <p style=”color:red;”>Our now RED paragraph!</p>
Here we do not need our selector as it is the tag itself, and we also do not need our braces, or quotes within the rules. All we include in our attribute’s value are the surrounding quotes and the rules we want to apply, still using : and ; appropriately. This is an effective means of responding to an event, or changing appearance through JavaScript.
There are a number of other things we can do with selectors in order to identify what we want to interact with. The * character can be used to apply to everything within page, or within a selector if one is specified. For example, * { color: blue} would make all text on the page blue (assuming it is the last rule applied… we will get to that) while footer * { color: blue} would make all items in our footer blue. This can be handy for development and testing to quickly adjust a number of items, but should be avoided in production as processing the rule can require examining a large number of elements, potentially increasing page load times.
We can target specific items by referring to them using their ID. To do this, we put a # in front of their ID name. As an example, we will create two divs, one with an ID of todo and another with an ID of complete, to make a quick task list:
- <div id=”todo”>
- <ul>
- <li>Check the mail</li>
- <li>Go to the store</li>
- <li>Take the dog to the vet </li>
- </ul>
- </div>
- <div id=”completed”>
- <ul>
- <li>Rent a movie</li>
- <li>Make grocery list</li>
- <li>Make vet appointment</li>
- </ul>
- </div>
|
By adding the following styles to this page, we can turn our To Do list red, and our Completed list green:
- <style>
- #todo { background-color:red; }
- #completed { background-color: green; }
- </style>
- Check the mail
- Go to the store
- Take the dog to the vet
- Rent a movie
- Make grocery list
- Make vet appointment
Important Reminder
Keep in mind we can only use an id name once on each page. If you want to apply these rules in more than one place, then you should use a class definition, coming up next!
We can use this technique on any tag that accepts an ID as an attribute (the actual rules we are allowed to use, however, differ depending on the element). To apply rules like this in multiple places, we will need to switch to a class definition. To do this, we simply change our # to a . and instead of relying on an element’s ID, we give it a class attribute with a value of the selector name we create in our style definition. We will tweak our last example to split our To Do list into “today” and “tomorrow” lists and rename our completed div to “done.” Then give both to do lists a class of todo, our done list a class of completed, and change our CSS rules to match:
- <style>
- .todo { background-color:red; }
- .completed { background-color: green; }
- </style>
- <div id=”today” class=”todo”>
- <ul>
- <li>Check the mail</li>
- <li> Go to the store</li>
- </ul>
- </div>
- <div id=”tomorrow” class=”todo”>
- <ul>
- <li>Take the dog to the vet </li>
- </ul>
- </div>
- <div id=”done” class=”completed”>
- <ul>
- <li>Rent a movie</li>
- <li>Make grocery list</li>
- <li>Make vet appointment</li>
- </ul>
- </div>
- Check the mail
- Go to the store
- Take the dog to the vet
- Rent a movie
- Make grocery list
- Make vet appointment
To add even more emphasis to our completed list we can make the list inside it show text as crossed out. We could do this by applying a style to an ID we assign it, or by giving that ul a class, but we already have enough structure in place to specify what we want by using a descendant selector. This selector type is specified by saying we want elements “a” inside elements “b” to have the style applied. In our example, we want <ul>s inside a .completed crossed off, so we will add the following rule to our styles:
- .completed ul { text-decoration: line-through; }
Now, if we add any more sections with a class of completed, they will also be crossed out automatically. You can try splitting your completed <div> into two pieces, like “yesterday” and “last week” to try it out.
Additional notes
Hover works on more than links! Just about any element has a hover state as long as the cursor position can be associated with it. Note: the z-index and position of layered elements can easily interfere with things like hover.
Hyperlinks are frequently styled so they change in appearance when they are hovered over or have already been clicked. We can assign our styles to these events by creating rules for <a> tags when they are unvisited, visited, or a hover (mouse pointer is over the link) state is attached:
- a:link {
- color:blue;
- }
- a:visited {
- color:grey;
- }
- a:hover{
- color:red;
- font-weight:bold;
- }
Try adding a link to your local Veterinarian’s office to the task in your todo list, and watch how it changes when you interact with it.
Sometimes you might find it easier to change something for all occurrences of an element that are not members of another rule. Instead of adding additional classes to those elements, we can specify an exception with the not state:
- div:not(.completed){ font-size:larger; }
This rule will make text in any div (whether or not they have the .todo class) text larger. Another handy set of states are :before and :after. These selectors allow us to place and style content as a prepend or append action to our element. If we wanted to prepend a To Do: title to our .todo class elements, we could add the following rule:
- .todo:before{
- content:”To Do:”;
- background-color:yellow;
- color:red;
- font-weight:bold;
- }
Important Reminder
Note: We cannot use the Content rule to add HTML to an element, only text. To achieve this, we would need to use JavaScript or another language that can manipulate the DOM.
The remainder of the selectors allow us to get even more specific, selecting the elements the appear before or after another given element, matching elements that have a particular attribute, or even matching attributes that contain a certain string as part of their value. For a full reference, I recommend the list at w3schools.com. Our completed example should now look like this:
- <style>
- .todo {
- background-color:red;
- }
- .completed {
- background-color: green;
- }
- .completed ul {
- text-decoration: line-through;
- }
- div:not(.completed){
- font-size:larger;
- }
- a:link {
- color:blue;
- }
- a:visited {
- color:grey;
- }
- a:hover{
- color:red;
- font-weight:bold;
- .todo:before{
- content:”To Do:”;
- background-color:yellow;
- color:red;
- font-weight:bold;
- }
- </style>
- <div id=”today” class=”todo”>
- <ul>
- <li>Check the mail</li>
- <li> Go to the store</li>
- </ul>
- </div>
- <div id=”tomorrow” class=”todo”>
- <ul>
- <li>Take the dog to the vet </li>
- </ul>
- </div>
- <div id=”yesterday” class=”completed”>
- <ul>
- <li>Rent a movie</li>
- </ul>
- </div>
- <div id=”lastWeek” class=”completed”>
- <ul>
- <li>Make grocery list</li>
- <a href=”http://www.dunkirkanimalclinic.com/”><li>Make vet appointment</li></a>
- </ul>
- </div>
To Do:
- Check the mail
- Go to the store
To Do:
- Take the dog to the vet
- Rent a movie
- Make grocery list
- Make vet appointment
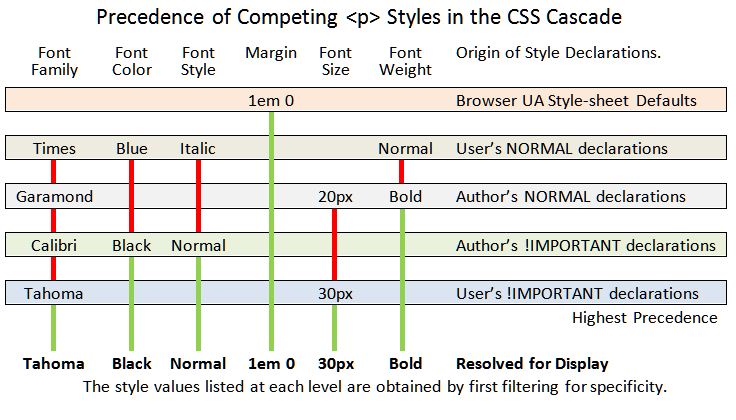
Order of Precedence
There are some rules to our rules. There is a hierarchy to how they are applied in order to provide a semblance of order and avoid conflicts. First, we need to consider where the rule is located. In general, the “closer” the CSS file is to the line of code using it, the more likely that particular CSS file will override what is in the others. For example, rules in an external style sheet would be overridden by those in an internal style sheet. Just the same, styles in an internal style sheet would replace the previous style sheet included. Styles that are added to the page, or attributes that are inline with the element they apply to, become the “closest” to what it is targeting.
Useful Feature
JavaScript code that affects appearance will frequently apply inline modifications to apply style changes to a page, but will not affect the CSS file or other pages.
When we discuss the overriding nature, it is important to remember that this applies to the specific rule. A set of rules for an <a> tag defined in an external sheet will not necessarily be overridden by the <a> tag rules in an internal style sheet. Each rule within the definition is examined, and is still applied if that particular rules does not appear “closer” to the element. For example:
An External Sheet:
- a {
- color:blue;
- text-decoration:none;
- }
An Internal Sheet:
- a { color:red;}
Our code:
- <head>
- <link rel=”style sheet” type=”text/css” href=”mystyle.css”>
- </head>
- <style>
- a { color:red;}
- </style>
Comparing the above example style sheets, we can see that the external sheet applies two rules: text color is blue, and there should not be an underline. However, our internal style sheet specifies a rule that color should be red. Since this rule is closer, our link will be red. The underline rule, however, is not defined in the internal sheet, so it will carry over and remain.
This also carries into the CSS rules themselves. Definitions can be general, like our example above that would apply to all links on our page, or they can be more specific to target a particular group or single link. The more specific we are, the greater influence our rule will have. For example:
- <style>
- a{
- color:red;
- }
- div.block a{
- color: blue;
- }
- </style>
- <body>
- <a href=””>Our RED link</a>
- <div class=”block”>
- <a href=””>Our BLUE link</a><br/>
- <a href=”” style=”color:green”>Our GREEN link</a>
- </div>
Above, our “a” style for our links is overridden in our div, as the block style is more particular, or close, to the actual link we want affected. However, our green link overrules our block style as it is inline, and applies to that specific link. From here, only a change in this inline style caused by JavaScript, or an “over-override” from a rule marked !important can trump the inline rule. The easiest way to debug CSS issues is with web developer tools that are an add-on or included in modern browsers like Chrome, that can show you exactly what rules are applied, overridden, and even let you test (temporary) changes before making them in your real file.
Caveat: User-enforced styles (settings the client enters in their browser, or applied by an accessibility program) also fit in to our precedence list, and can override any styles we set.
 By Armchair [Public domain], via Wikimedia Commons
Learn more
Keywords, search terms: css rules, rule structure, selectors, css classes and ids
A list of all CSS properties: http://www.blooberry.com/indexdot/css/propindex/all.htm
All of the selectors: http://www.w3.org/TR/CSS2/selector.html
Some tips, tricks and more features: http://www.instantshift.com/2010/03/15/47-css-tips-tricks-to-take-your-site-to-the-next-level/

![By Armchair [Public domain], via Wikimedia Commons](http://commons.wikimedia.org/wiki/File:CSSsyntax3.JPG)
![By Armchair [Public domain], via Wikimedia Commons](http://commons.wikimedia.org/wiki/File:CascadeOfStyles5.JPG)