
Section 3: Scripting Languages
Chapter 34: JavaScript Syntax
Tags
Defining your block of JavaScript code in HTML is done with the use of another set of HTML tags we have not used yet, <script>. The script tags allow us to link to a script file or mark off a section of our code for our JavaScript to reside in. We can place script tags in any section of our HTML. Traditionally, JavaScript is placed in the head of the page, especially when the code consists of functions to be called or actions that are to occur on page load. If your JavaScript will be shorter or creates some simple output, you might find it easier to place it in your code where you want the output to be.
As the <script> tags can be used for more than just JavaScript, it is recommended to clarify what type of code the tags contain. To start with an example where we link to an external JavaScript file, we will use a <script> tag and give it attributes to define what our code is and where it lives.
Additional Notes
If your JavaScript’s action or output is not critical to visual layout or output of your page, you can move <script> tags to the bottom of your page. This allows the page to render before processing your JavaScript, and gives the user a faster (seeming) experience.
- <script type=”text/javascript ” src=”http://someplace.com/scripts/ourscript.js”>
This example would populate the <script> tag set with the contents of the JavaScript file just like we did with CSS. Also like our CSS examples, we can place our JavaScript entirely in the HTML as well. To use the ubiquitous Hello World example yet again, we would replace our example above with the following:
- <script type=”text/javascript”>
- alert(“Hello World!”);
- </script>
The alert function in JavaScript will create the pop up box in our browser that must be closed by the user. By placing this block of code into either the head or body of a blank page as follows, we will get an alert box instead of text on the page:
- <html>
- <head>
- <script type=”text/javascript”>
- alert(“Hello World!”);
- </script>
- </head>
- <body/>
- </html>
Not only is this a little more exciting than just printing it onto our page, we can even add some control to when we receive this output by giving it a trigger event. A trigger event is anything that can be monitored in order to cause another action to occur. In this case, our trigger event will be a click of a button. To do this, we need to stop our alert from running as soon as the page loads. We will do that by wrapping it in a function declaration so it only runs when we call it, and then add a button that calls the function:
- <head>
- <script>
- function howdy(){
- alert(“Hello world!”);
- }
- </script>
- </head>
- <body>
- <input type=”button” onclick=”howdy()” value=”Our Button” />
- </body>
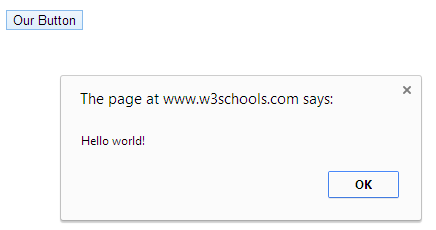
Now when we load our page, the alert window will not show up until we click our button. If it does not, you may need to check your JavaScript settings to make sure it is allowed in your browser. If you are unfamiliar with how to do this, search the Internet for your browser type, version number, and the words enable JavaScript for directions. JavaScript is usually enabled by default, so a double check of your code for typos may also be in order.
Variables
Creating variables in JavaScript is very similar to PHP. The variable names still need to begin with a letter, and are case sensitive. They can also start with $ or _ to help us identify them. One difference is that when we declare variables in JavaScript, we do so by putting “var” in front of them. This identifies what follows as a variable, like the $ in PHP. To convert our example into a string variable, we would adjust it as follows:
- <head>
- <script>
- function howdy(){
- var str=”Hello World”;
- alert(str);
- }
- </script>
- </head>
- <body>
- <input type=”button” onclick=”howdy()” value=”Our Button” />
- </body>
Output
The “echo“ or “print” equivalent in JavaScript can be achieved by instructing it to place the text you want into the DOM (Document Object Model). We reference the document object in JavaScript with the word document, and call the write method to produce our output:
- <script language=”javascript”>
- document.write (“Some output from <b>JavaScript!</b>”);
- </script>
We can be more specific as to the exact place(s) on the page we wish to put our content. In PHP, we would simply place our print or echo statement where we want the content to appear. With JavaScript we can continue to take advantage of the document object model to specify where we want output to be. This also means the script that makes the content can be stored in a separate location from the output location itself:
- <script language=”javascript”>
- document.getElementById(“ourText”).innerHTML =”Hello World”;
- </script>
- <div id=”ourText”></div>
No matter where the “ourText” div is on our page, or where the script is, the div would contain Hello World as its text. This is the basic approach taken when we use JavaScript to make changes to our page.
Strings
While strings work largely the same as they do in PHP and other languages, concatenation is achieved by the use of the concat() function, or the plus (+) sign instead of PHP’s use of period (.). Let us take a look at a couple examples to see the difference:
- str1 = “Hello World!”;
- str2 = “How are you?”;
- output = str1.concat(str2); // Note we use . to access concat() from the string
- output = str1 + ” ” + str2; // Concating with +, which works like PHP’s .
Arrays
Arrays in JavaScript work in much the same way as PHP. All we need to keep in mind is that our output needs to use DOM manipulation:
- <script>
- //Some examples of setting and using array variables
- var x;
- var mycars = new Array();
- mycars[0] = “Saab”;
- mycars[1] = “Volvo”;
- mycars[2] = “BMW”;
- for (x=0; x<stooges.length; x++){
- document.write(mycars[x] + “<br>”);
- }
- </script>
Braces and Semi-colons
When a control structure only has one line, JavaScript will allow us to skip the curly brackets that would normally outline its contents. We also do not need to include semi-colons as long as we include a line break after most statements. However, leaving either of these items out can create bugs by inconsistent coding. Adding a second line to your condition statement when not using brackets might work in some cases, but not all. Instead of a syntax error, though, it would be interpreted as part of the next statement after it. This will create a harder to find logic error.
Learn more
Keywords, search terms: JavaScript syntax
Mozilla Developer Network: https://developer.mozilla.org/en-US/docs/Web/JavaScript?redirectlocale=en-US&redirectslug=JavaScript
